Zookeeper 会话管理
本章将对 Zookeeper 项目中会话管理相关内容进行分析。
服务端处理会话请求
本节将对Zookeeper中服务端对会话请求的处理流程进行分析,负责处理的方法是NIOServerCnxn#readConnectRequest,具体代码如下。
private void readConnectRequest() throws IOException, InterruptedException {
    if (!isZKServerRunning()) {
        throw new IOException("ZooKeeperServer not running");
    }
    zkServer.processConnectRequest(this, incomingBuffer);
    initialized = true;
}
在上述代码中首先会判断zk服务是否处于运行状态,如果处于非运行状态将抛出异常结束处理,反之则交给processConnectRequest方法进行处理,处理代码如下。
public void processConnectRequest(ServerCnxn cnxn, ByteBuffer incomingBuffer)
  throws IOException {
  // 读取数据相关对象构造
  BinaryInputArchive bia =
    BinaryInputArchive.getArchive(new ByteBufferInputStream(incomingBuffer));
  ConnectRequest connReq = new ConnectRequest();
  // 反序列化 connect 数据
  connReq.deserialize(bia, "connect");
  if (LOG.isDebugEnabled()) {
    LOG.debug("Session establishment request from client "
              + cnxn.getRemoteSocketAddress()
              + " client's lastZxid is 0x"
              + Long.toHexString(connReq.getLastZxidSeen()));
  }
  // 判断是否只读
  boolean readOnly = false;
  try {
    readOnly = bia.readBool("readOnly");
    cnxn.isOldClient = false;
  } catch (IOException e) {
    LOG.warn("Connection request from old client "
             + cnxn.getRemoteSocketAddress()
             + "; will be dropped if server is in r-o mode");
  }
  // 非只读并且当前zk服务是只读服务抛出异常
  if (!readOnly && this instanceof ReadOnlyZooKeeperServer) {
    String msg = "Refusing session request for not-read-only client "
      + cnxn.getRemoteSocketAddress();
    LOG.info(msg);
    throw new CloseRequestException(msg);
  }
  // 判断连接器请求中的zxid是否大于数据树中的最大zxid,如果是则抛出异常
  if (connReq.getLastZxidSeen() > zkDb.dataTree.lastProcessedZxid) {
    String msg = "Refusing session request for client "
      + cnxn.getRemoteSocketAddress()
      + " as it has seen zxid 0x"
      + Long.toHexString(connReq.getLastZxidSeen())
      + " our last zxid is 0x"
      + Long.toHexString(getZKDatabase().getDataTreeLastProcessedZxid())
      + " client must try another server";

    LOG.info(msg);
    throw new CloseRequestException(msg);
  }
  // 读取会话超时时间
  int sessionTimeout = connReq.getTimeOut();
  // 读取密码
  byte passwd[] = connReq.getPasswd();
  // 超时时间相关处理
  int minSessionTimeout = getMinSessionTimeout();
  if (sessionTimeout < minSessionTimeout) {
    sessionTimeout = minSessionTimeout;
  }
  int maxSessionTimeout = getMaxSessionTimeout();
  if (sessionTimeout > maxSessionTimeout) {
    sessionTimeout = maxSessionTimeout;
  }
  // 设置超时时间
  cnxn.setSessionTimeout(sessionTimeout);
  // 在会话建立完成之前禁止接收数据
  cnxn.disableRecv();
  // 获取session id
  long sessionId = connReq.getSessionId();
  // 如果session id 等于0
  if (sessionId == 0) {
    // 重算session id
    long id = createSession(cnxn, passwd, sessionTimeout);
    LOG.debug("Client attempting to establish new session:" +
              " session = 0x{}, zxid = 0x{}, timeout = {}, address = {}",
              Long.toHexString(id),
              Long.toHexString(connReq.getLastZxidSeen()),
              connReq.getTimeOut(),
              cnxn.getRemoteSocketAddress());
  }
  // session id 非零的情况
  else {
    // 从连接请求中获取session id
    long clientSessionId = connReq.getSessionId();
    LOG.debug("Client attempting to renew session:" +
              " session = 0x{}, zxid = 0x{}, timeout = {}, address = {}",
              Long.toHexString(clientSessionId),
              Long.toHexString(connReq.getLastZxidSeen()),
              connReq.getTimeOut(),
              cnxn.getRemoteSocketAddress());
    // 如果serverCnxnFactory不为空关闭session
    if (serverCnxnFactory != null) {
      serverCnxnFactory.closeSession(sessionId);
    }
    // 如果secureServerCnxnFactory不为空关闭session
    if (secureServerCnxnFactory != null) {
      secureServerCnxnFactory.closeSession(sessionId);
    }
    // 设置session id
    cnxn.setSessionId(sessionId);
    // 重新打开session
    reopenSession(cnxn, sessionId, passwd, sessionTimeout);
  }
}
在上述代码中核心处理流程如下。
-
创建读取数据相关的对象。
-
读取readOnly数据,如果readOnly数据表示为false并且当前zk服务是只读服务将抛出异常。
-
从连接请求中获取zxid(这个zxid是客户端的最大zxid),从数据树中获取处理过的最大zxid,如果前者大于后者将抛出异常。
-
计算会话超时时间,将其赋值给cnxn(服务器链接对象)。
-
执行ServerCnxn#disableRecv方法,目的是为了在会话建立完成之前禁止接收数据。
-
从连接请求中获取session id,如果session id 为0通过createSession计算sessionId,注意这个id不会覆盖到请求连接中的session id,仅在debug级别的日志中进行输出。在session id 非0的情况操作流程如下。
- 从连接请求对象中获取session id。
- 如果变量serverCnxnFactory和变量secureServerCnxnFactory不为空需要进行session关闭操作。关闭的是ServerCnxn对象。
-
为连接对象设置session id。
-
通过reopenSession方法重新打开session。
在processConnectRequest方法中最重要的方法是reopenSession,接下来对reopenSession方法进行分析,具体处理代码如下。
public void reopenSession(ServerCnxn cnxn, long sessionId, byte[] passwd,
                          int sessionTimeout) throws IOException {
  // 检查密码
  if (checkPasswd(sessionId, passwd)) {
    // 验证会话
    revalidateSession(cnxn, sessionId, sessionTimeout);
  }
  else {
    LOG.warn("Incorrect password from " + cnxn.getRemoteSocketAddress()
             + " for session 0x" + Long.toHexString(sessionId));
    // 完成会话创建
    finishSessionInit(cnxn, false);
  }
}
在上述代码中处理流程:通过checkPasswd方法进行密码校验,如果密码校验通过则通过revalidateSession方法重新验证session,反之则通过finishSessionInit方法完成会话创建。在revalidateSession方法中最后仍然会调用finishSessionInit方法,与外部直接调用的不同是第二个参数会通过SessionTracker#touchSession方法进行计算。
接下来将对finishSessionInit方法进行分析,具体处理代码如下。
public void finishSessionInit(ServerCnxn cnxn, boolean valid) {
  try {
    // 如果验证通过
    if (valid) {
      // 注册连接对象
      if (serverCnxnFactory != null && serverCnxnFactory.cnxns.contains(cnxn)) {
        serverCnxnFactory.registerConnection(cnxn);
      } else if (secureServerCnxnFactory != null
                 && secureServerCnxnFactory.cnxns.contains(cnxn)) {
        secureServerCnxnFactory.registerConnection(cnxn);
      }
    }
  } catch (Exception e) {
    LOG.warn("Failed to register with JMX", e);
  }

  try {
    // 创建连接响应对象
    ConnectResponse rsp = new ConnectResponse(0, valid ? cnxn.getSessionTimeout()
                                              : 0, valid ? cnxn.getSessionId() : 0, // send 0 if session is no
                                              // longer valid
                                              valid ? generatePasswd(cnxn.getSessionId()) : new byte[16]);
    ByteArrayOutputStream baos = new ByteArrayOutputStream();
    BinaryOutputArchive bos = BinaryOutputArchive.getArchive(baos);
    bos.writeInt(-1, "len");
    // 连接对象写入到bos
    rsp.serialize(bos, "connect");
    // 判断是否是老版本的客户端
    if (!cnxn.isOldClient) {
      // 设置是否只读
      bos.writeBool(
        this instanceof ReadOnlyZooKeeperServer, "readOnly");
    }
    // 关闭 baos
    baos.close();
    // 将baos转换为字节流通过连接对象发出去
    ByteBuffer bb = ByteBuffer.wrap(baos.toByteArray());
    bb.putInt(bb.remaining() - 4).rewind();
    cnxn.sendBuffer(bb);

    // 验证通过
    if (valid) {
      LOG.debug("Established session 0x"
                + Long.toHexString(cnxn.getSessionId())
                + " with negotiated timeout " + cnxn.getSessionTimeout()
                + " for client "
                + cnxn.getRemoteSocketAddress());
      // 恢复数据接收
      cnxn.enableRecv();
    } else {

      LOG.info("Invalid session 0x"
               + Long.toHexString(cnxn.getSessionId())
               + " for client "
               + cnxn.getRemoteSocketAddress()
               + ", probably expired");
      // 发送关闭连接信息
      cnxn.sendBuffer(ServerCnxnFactory.closeConn);
    }

  } catch (Exception e) {
    LOG.warn("Exception while establishing session, closing", e);
    // 关闭连接对象
    cnxn.close();
  }
}
在上述代码中核心处理流程如下。
- 判断是否通过验证,在通过验证的情况下会将连接对象注册到serverCnxnFactory中或者secureServerCnxnFactory中。
- 创建连接响应对象。
- 创建BinaryOutputArchive对象,向其中写入如下数据。
- tag:len,值为-1
- tag:connect,值为响应对象。
- 如果使用的客户端不是老版本的客户端,tag:readOnly,值为当前服务是否是ReadOnlyZooKeeperServer类型的结果。
- 连接对象将数据发送,发送数据为第三步中的数据。
- 如果验证通过则恢复连接对象对数据的接收能力,反之则发送关闭连接的消息。
SessionTracker 概述
本节将对SessionTracker接口进行简要概述,该接口在Zookeeper项目中用于进行会话管理,也可以理解为会话追踪。在该接口中定义了十三个方法以及两个接口,关于方法相关信息见表
| 方法名称 | 方法作用 | 方法参数 |
|---|---|---|
| createSession | 创建session id | 1. sessionTimeout session过期时间 |
| addGlobalSession | 添加全局session | 1. id:session id<br />2. to:session 过期时间 |
| addSession | 添加session | 1. id:session id<br />2. to:session 过期时间 |
| touchSession | 会话是否处于活跃状态 | 1. sessionId:session id<br />2. sessionTimeout session 超时时间 |
| setSessionClosing | 设置session处于正在关闭状态 | 1. sessionId:session id |
| shutdown | 关闭SessionTracker | 1. sessionId:session id |
| removeSession | 移除session | 1. sessionId:session id |
| isTrackingSession | 判断是否跟踪会话id | 1. sessionId:session id |
| checkSession | 检查session | 1. sessionId:session id<br />2. owner:会话所有者 |
| checkGlobalSession | 检查全局session | 1. sessionId:session id<br />2. owner:会话所有者 |
| setOwner | 设置会话所有者 | 1. id:session id<br />2. owner:会话所有者 |
| dumpSessions | 转储session | 1. pwriter:输出写出器 |
| getSessionExpiryMap | 获取过期的session |
在Zookeeper中SessionTracker接口的实现类图如图所示。
![]()
接下来对内部接口Session进行说明,定义代码如下。
interface Session {
  long getSessionId();

  int getTimeout();

  boolean isClosing();
}
在Session接口中定义了三个方法。
- 方法getSessionId用于获取sessionId。
- 方法getTimeout用于获取过期时间。
- 方法isClosing用于判断是否已经关闭。
在Zookeeper中Session接口的实现类是SessionImpl,具备四个成员变量,详细内容见表。
| 变量名称 | 变量类型 | 变量说明 |
|---|---|---|
| sessionId | long | 会话id |
| timeout | int | 会话超时时间 |
| isClosing | boolean | 是否处于关闭状态 |
| owner | Object | 所有者 |
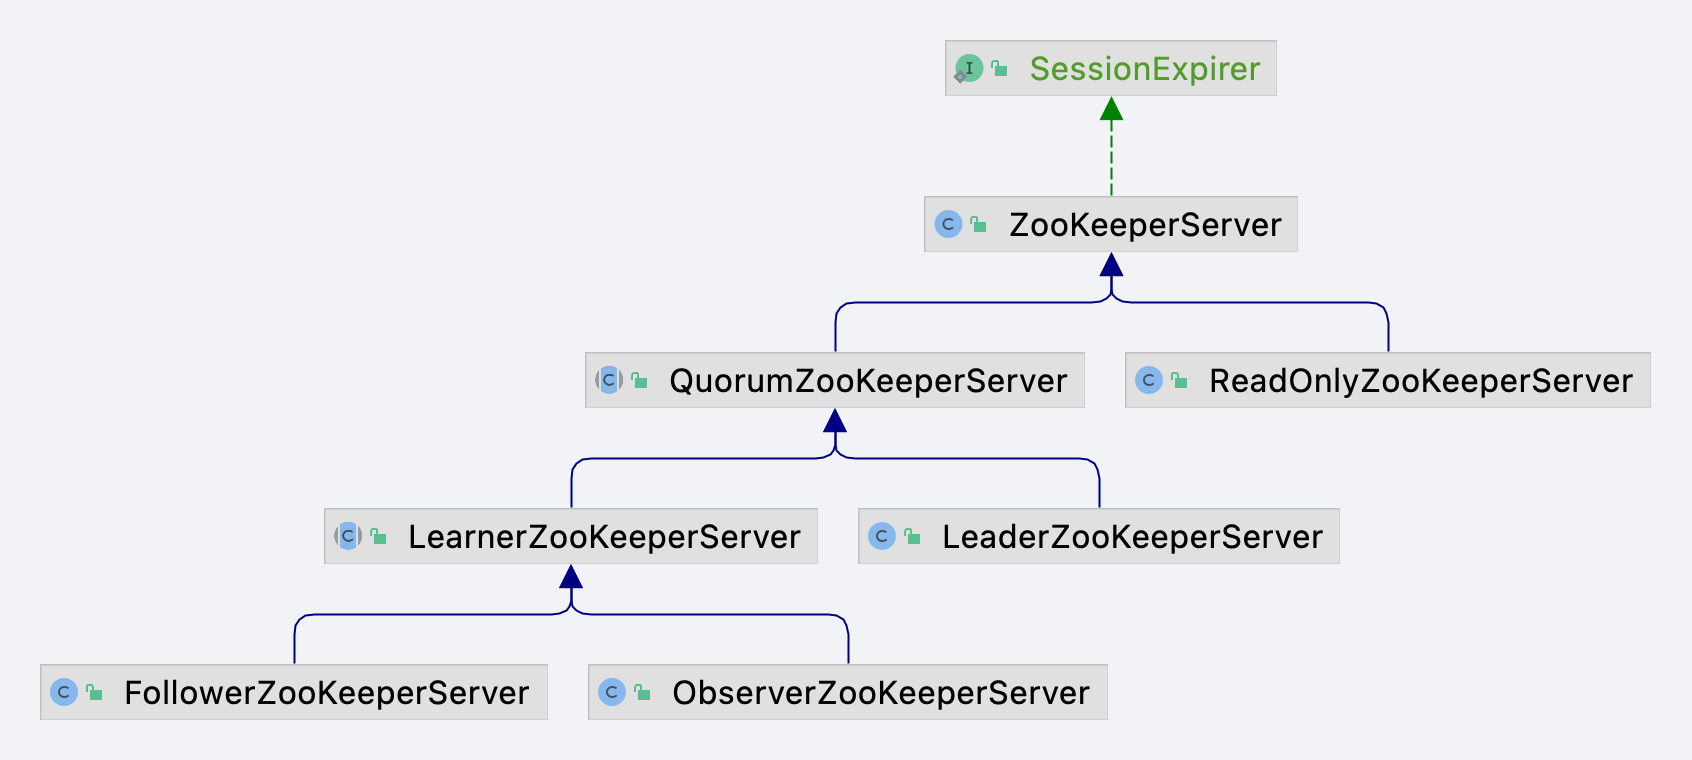
最后对内部接口SessionExpirer进行说明,定义代码如下。
interface SessionExpirer {
  void expire(Session session);

  long getServerId();
}
在SessionExpirer接口中定义了两个方法。
- 方法expire可以使得一个session过期。
- 方法getServerId用于获取服务id。
在Zookeeper中SessionExpirer接口的实现类图如图所示。
SessionTrackerImpl 分析
本节将对SessionTrackerImpl类进行分析,该类在整个会话管理中所使用到的频率相当高,在其他会话管理实现类中也有相关使用。首先介绍SessionTrackerImpl类中的成员变量,具体信息见表。
| 变量名称 | 变量类型 | 变量说明 |
|---|---|---|
| sessionsById | ConcurrentHashMap<Long, SessionImpl> | session id 和 SessionImpl的映射关系 |
| sessionExpiryQueue | ExpiryQueue<SessionImpl> | 过期队列 |
| sessionsWithTimeout | ConcurrentMap<Long, Integer> | session id 和 session 过期时间映射关系 |
| nextSessionId | AtomicLong | 下一个session id |
| expirer | SessionExpirer | session 过期接口 |
| running | boolean | 是否处于运行状态 |
了解成员变量后下面对SessionTrackerImpl类的构造函数进行分析,构造函数代码如下。
public SessionTrackerImpl(SessionExpirer expirer,
                          ConcurrentMap<Long, Integer> sessionsWithTimeout, int tickTime,
                          long serverId, ZooKeeperServerListener listener) {
    super("SessionTracker", listener);
    this.expirer = expirer;
    this.sessionExpiryQueue = new ExpiryQueue<SessionImpl>(tickTime);
    this.sessionsWithTimeout = sessionsWithTimeout;
    this.nextSessionId.set(initializeNextSession(serverId));
    for (Entry<Long, Integer> e : sessionsWithTimeout.entrySet()) {
        addSession(e.getKey(), e.getValue());
    }

    EphemeralType.validateServerId(serverId);
}
在构造函数中会完成父构造函数的调用以及成员变量的赋值,其中最关键的是initializeNextSession函数和addSession函数,前者用来初始化sessionId,后者用来完成session的过期时间设置。接下来对initializeNextSession方法进行分析,具体处理代码如下。
public static long initializeNextSession(long id) {

  long nextSid;
  // 当前时间(毫秒)左移24位,无符号右移8位
  nextSid = (Time.currentElapsedTime() << 24) >>> 8;
  // sid 与id左移56位后或运算
  nextSid = nextSid | (id << 56);
  // 判断计算的sid是否和最小long值相同,如果相同则进行加一操作
  if (nextSid == EphemeralType.CONTAINER_EPHEMERAL_OWNER) {
    ++nextSid;
  }
  return nextSid;
}
在initializeNextSession方法中需要了解参数id是什么,它是Zookeeper服务配置文件中的myId数据。回到方法中它的处理流程如下。
- 获取当前时间戳(毫秒级别),左移24位,无符号右移动8位。
- 将参数id左移56位。
- 将第(1)步中的数据和第(2)步中的数据进行或("|")运算。
- 如果第(3)步中的运算结果和long最小值相同则会将第(3)步的计算结果加一。
整体运算结果用64位表示,将64位拆分成8段每一段8位,整体细节如下。
- 第一个8位表示服务id。
- 第二个8位到第六个8位表示时间戳。
- 第七个8位到第八个8位为0。
下面对addSession方法进行分析,具体处理代码如下。
public synchronized boolean addSession(long id, int sessionTimeout) {
  // 向sessionsWithTimeout容器中加入数据
  sessionsWithTimeout.put(id, sessionTimeout);

  boolean added = false;

  // 从sessionsById容器中根据session id 获取session
  SessionImpl session = sessionsById.get(id);
  // 不存在创建
  if (session == null) {
    session = new SessionImpl(id, sessionTimeout);
  }

  // 向sessionsById容器中加入session
  SessionImpl existedSession = sessionsById.putIfAbsent(id, session);

  if (existedSession != null) {
    session = existedSession;
  }
  else {
    added = true;
    LOG.debug("Adding session 0x" + Long.toHexString(id));
  }

  if (LOG.isTraceEnabled()) {
    String actionStr = added ? "Adding" : "Existing";
    ZooTrace.logTraceMessage(LOG, ZooTrace.SESSION_TRACE_MASK,
                             "SessionTrackerImpl --- " + actionStr + " session 0x"
                             + Long.toHexString(id) + " " + sessionTimeout);
  }

  // 更新session过期信息
  updateSessionExpiry(session, sessionTimeout);
  return added;
}
在上述代码中需要注意这是一个线程安全的方法,具体处理流程如下。
- 向sessionsWithTimeout容器加入session id和过期时间。
- 创建session对象
- 从sessionsById容器中根据session id 获取session,将获取结果赋值到第(2)步的session对象,如果session对象不存在则需要创建session对象,同时将数据赋值到第(2)步的session对象。
- 向sessionsById容器中通过putIfAbsent方法加入session,如果session id在容器中已经存在则会获取session对象,如果session不为空将赋值到第(2)步的session对象。
- 通过updateSessionExpiry方法更新session过期信息。
在上述操作中最终会通过updateSessionExpiry方法更新session过期数据,具体处理代码如下。
private void updateSessionExpiry(SessionImpl s, int timeout) {
  logTraceTouchSession(s.sessionId, timeout, "");
  sessionExpiryQueue.update(s, timeout);
}
在updateSessionExpiry方法中执行两个操作。
- 记录日志信息。
- 向变量sessionExpiryQueue更新session过期时间。
在updateSessionExpiry方法中所使用到关键变量是sessionExpiryQueue,它的类型是ExpiryQueue,在本节后半部分将会对其进行分析。
getSessionExpiryMap 方法分析
本节将对getSessionExpiryMap方法进行分析,在该方法中核心是进行一种数据结构的转换,详细代码如下。
synchronized public Map<Long, Set<Long>> getSessionExpiryMap() {
    Map<Long, Set<SessionImpl>> expiryMap = sessionExpiryQueue.getExpiryMap();
    Map<Long, Set<Long>> sessionExpiryMap = new TreeMap<Long, Set<Long>>();
    for (Entry<Long, Set<SessionImpl>> e : expiryMap.entrySet()) {
        Set<Long> ids = new HashSet<Long>();
        sessionExpiryMap.put(e.getKey(), ids);
        for (SessionImpl s : e.getValue()) {
            ids.add(s.sessionId);
        }
    }
    return sessionExpiryMap;
}
在上述代码中核心处理流程如下。
- 从变量sessionExpiryQueue中获取过期信息,key表示过期时间,value表示过期的session集合。
- 将第(1)步中的过期信息转换为另一个map结构,该map结构key表示过期时间,value表示session id 集合。
touchSession 方法分析
本节将对touchSession方法进行分析,该方法的核心目标是判断session是否处于活跃(有效)状态,具体处理代码如下。
synchronized public boolean touchSession(long sessionId, int timeout) {
  // 根据session id 获取session
  SessionImpl s = sessionsById.get(sessionId);

  // session 为空返回false
  if (s == null) {
    logTraceTouchInvalidSession(sessionId, timeout);
    return false;
  }

  // session 处于关闭状态 返回false
  if (s.isClosing()) {
    logTraceTouchClosingSession(sessionId, timeout);
    return false;
  }

  // 更新过期时间
  updateSessionExpiry(s, timeout);
  return true;
}

private void updateSessionExpiry(SessionImpl s, int timeout) {
  logTraceTouchSession(s.sessionId, timeout, "");
  sessionExpiryQueue.update(s, timeout);
}
在上述代码中处理流程如下。
- 根据session id从sessionsById容器中获取session。
- 判断session是否为空,如果为空则进行日志记录并返回false。
- 判断session是否处于关闭状态,如果为是则进行日志记录并返回false。
- 通过 updateSessionExpiry方法更新session过期时间,返回true。
setSessionClosing 方法分析
本节将对setSessionClosing方法进行分析,该方法的作用是修改关闭标记,具体处理代码如下。
synchronized public void setSessionClosing(long sessionId) {
    if (LOG.isTraceEnabled()) {
        LOG.trace("Session closing: 0x" + Long.toHexString(sessionId));
    }
    SessionImpl s = sessionsById.get(sessionId);
    if (s == null) {
        return;
    }
    s.isClosing = true;
}
在上述代码中核心处理流程如下。
- 根据session id从sessionsById容器中获取session。
- 如果session为空则结束处理,如果session不为空则将isClosing属性设置为true。
removeSession 方法分析
本节将对removeSession方法进行分析,该方法主要是操作三个变量将对应session相关数据移除,具体代码如下。
synchronized public void removeSession(long sessionId) {
    LOG.debug("Removing session 0x" + Long.toHexString(sessionId));
    SessionImpl s = sessionsById.remove(sessionId);
    sessionsWithTimeout.remove(sessionId);
    if (LOG.isTraceEnabled()) {
        ZooTrace.logTraceMessage(LOG, ZooTrace.SESSION_TRACE_MASK,
                "SessionTrackerImpl --- Removing session 0x"
                        + Long.toHexString(sessionId));
    }
    if (s != null) {
        sessionExpiryQueue.remove(s);
    }
}
在上述代码中核心处理流程如下。
- 在sessionsById容器中根据session id移除一个session,并将该session临时保存在内存中。
- 在sessionsWithTimeout容器中根据session id移除。
- 若第(1)步中临时存在内存中的session存在则需要将其从sessionExpiryQueue变量中移除。
checkSession 方法分析
本节将对checkSession方法进行分析,在该方法中主要检查如下三项信息。
- session id 对应的session是否存在。
- session 是否过期。
- session所有者是否和参数所有者相同。
上述三项信息检查代码如下。
public synchronized void checkSession(long sessionId, Object owner)
        throws KeeperException.SessionExpiredException,
        KeeperException.SessionMovedException,
        KeeperException.UnknownSessionException {
    LOG.debug("Checking session 0x" + Long.toHexString(sessionId));
    // 获取 session
    SessionImpl session = sessionsById.get(sessionId);

    // session 为空抛出异常
    if (session == null) {
        throw new KeeperException.UnknownSessionException();
    }

    // session 已关闭抛出异常
    if (session.isClosing()) {
        throw new KeeperException.SessionExpiredException();
    }

    // 所有者为空赋值所有者
    if (session.owner == null) {
        session.owner = owner;
    }
    // session 所有者和参数所有者不匹配抛出异常
    else if (session.owner != owner) {
        throw new KeeperException.SessionMovedException();
    }
}
run 方法分析
由于SessionTrackerImpl类实现了ZooKeeperCriticalThread,它是一个线程对象因此对于run方法的分析也尤为重要,具体处理代码如下。
@Override
public void run() {
  try {
    while (running) {
      // 获取等待时间
      long waitTime = sessionExpiryQueue.getWaitTime();
      if (waitTime > 0) {
        Thread.sleep(waitTime);
        continue;
      }

      // 从session过期队列中获取session
      for (SessionImpl s : sessionExpiryQueue.poll()) {
        // 设置关闭状态
        setSessionClosing(s.sessionId);
        // 进行过期接口操作
        expirer.expire(s);
      }
    }
  } catch (InterruptedException e) {
    handleException(this.getName(), e);
  }
  LOG.info("SessionTrackerImpl exited loop!");
}
在上述代码中核心操作时定期的将session进行关闭状态设置以及过期接口调用,整体是以死循环的形式进行处理,跳出循环的条件是running标志为false,想要使其设置为false则需要调用shutdown方法,在一个循环中会进行如下操作。
- 从sessionExpiryQueue变量中获取需要等待的时间,如果等待时间大于0则进行等待(线程等待)。
- 从sessionExpiryQueue变量中获取需要进行关闭操作的session,将isClosing属性设置为true,调用过期接口的方法(SessionTracker.SessionExpirer#expire)。
接下来对获取等待时间的方法进行说明,具体处理代码如下。
public long getWaitTime() {
  long now = Time.currentElapsedTime();
  long expirationTime = nextExpirationTime.get();
  return now < expirationTime ? (expirationTime - now) : 0L;
}
在上述代码中核心处理流程如下。
- 获取当前时间和过期时间。
- 判断当前时间是否小于过期时间,如果是则将过期时间减去当前时间作为等待时间返回,如果不是则返回0立即开始执行session关闭操作。
最后对expire方法进行分析,在Zookeeper中该方法的实现由ZooKeeperServer类提供,具体代码如下
public void expire(Session session) {
  long sessionId = session.getSessionId();
  LOG.info("Expiring session 0x" + Long.toHexString(sessionId) + ", timeout of "
           + session.getTimeout() + "ms exceeded");
  close(sessionId);
}
在上述代码中处理流程:从session对象中获取session id然后调用关闭方法。
ExpiryQueue 分析
本节将对ExpiryQueue类进行分析,该类主要用于储存过期信息,常用于session过期处理,首先需要了解该类的成员变量,具体信息见表。
| 变量名称 | 变量类型 | 变量说明 |
|---|---|---|
| elemMap | ConcurrentHashMap<E, Long> | 过期容器,key:过期对象,value: 过期时间 |
| expiryMap | ConcurrentHashMap<Long, Set<E>> | 过期容器,key: 过期时间,value: 过期对象集合 |
| nextExpirationTime | AtomicLong | 下一个过期时间 |
| expirationInterval | int | 间隔期间 |
了解成员变量后下面对构造函数进行分析,具体构造函数代码如下。
public ExpiryQueue(int expirationInterval) {
    this.expirationInterval = expirationInterval;
    nextExpirationTime.set(roundToNextInterval(Time.currentElapsedTime()));
}
在构造函数中会设置变量nextExpirationTime和变量expirationInterval,其中后者是构造函数参数直接赋值,二前者则需要通过roundToNextInterval函数进行计算,计算代码如下。
private long roundToNextInterval(long time) {
    return (time / expirationInterval + 1) * expirationInterval;
}
在上述代码中计算逻辑:(当前时间戳(毫秒级别)除以过期间隔+1 )乘过期间隔。接下来对ExpiryQueue类中的部分方法进行分析,首先对用于添加或更新的update方法进行分析,具体处理代码如下。
public Long update(E elem, int timeout) {
  // 从elemMap容器中根据元素获取过期时间,含义为上一个过期时间
  Long prevExpiryTime = elemMap.get(elem);
  // 获取当前时间
  long now = Time.currentElapsedTime();
  // 计算下一个过期时间
  Long newExpiryTime = roundToNextInterval(now + timeout);

  // 判断新的过期时间和上一个过期时间是否相同,如果相同则返回null
  if (newExpiryTime.equals(prevExpiryTime)) {
    return null;
  }

  // First add the elem to the new expiry time bucket in expiryMap.
  // 获取过期时间对应的数据
  Set<E> set = expiryMap.get(newExpiryTime);
  if (set == null) {
    // 创建set对象
    set = Collections.newSetFromMap(
      new ConcurrentHashMap<E, Boolean>());
    // 向expiryMap容器中加入过期数据
    Set<E> existingSet = expiryMap.putIfAbsent(newExpiryTime, set);
    // 存在历史过期数据将其赋值到set变量
    if (existingSet != null) {
      set = existingSet;
    }
  }
  // 将参数数据加入到set集合中
  set.add(elem);

  // 向elemMap容器加入elem数据,并获取历史过期时间
  prevExpiryTime = elemMap.put(elem, newExpiryTime);
  // 历史过期时间不为空
  // 新的过期时间和历史过期时间不相同
  if (prevExpiryTime != null && !newExpiryTime.equals(prevExpiryTime)) {
    // 根据历史过期时间获取过期元素集合
    Set<E> prevSet = expiryMap.get(prevExpiryTime);
    // 过期元素集合不为空的情况下移除当前元素
    if (prevSet != null) {
      prevSet.remove(elem);
    }
  }
  return newExpiryTime;
}
在上述代码中核心处理流程如下。
-
从elemMap容器中根据参数元素获取过期时间(历史过期时间),使用变量prevExpiryTime存储。
-
获取当前时间。
-
通过roundToNextInterval方法计算下一个过期时间,计算参数:当前时间+过期时间(过期时间是参数传递的)。
-
判断下一个过期时间和历史过期时间是否相同,如果相同则返回null,结束处理。
-
根据过期时间从expiryMap容器中获取需要过期的数据集合,使用变量set存储
-
如果需要过期的数据集合为空,则会创建集合对象。尝试将新的过期时间和新建的集合对象放入到expiryMap容器中,获取在容器中存储的历史数据,如果历史数据存在则会将其设置到变量set中。
-
将当前方法参数elem放入到set变量中。
-
向elemMap容器加入方法参数elem数据,并获取历史过期时间。
-
如果第(8)步中的历史过期时间不为空并且该时间与第(3)步中的过期时间不相同则进行如下操作。
- 根据第(8)步中的过期时间获取过期元素集合。如果过期元素存在则将方法参数elem从中移除。
-
返回第(3)步中的下一个过期时间。
接下来对poll函数进行分析,该函数用于获取过期数据,具体处理代码如下。
public Set<E> poll() {
  // 获取当前时间
  long now = Time.currentElapsedTime();
  // 获取过期时间
  long expirationTime = nextExpirationTime.get();
  // 如果当前时间小于过期时间,返回空集合
  if (now < expirationTime) {
    return Collections.emptySet();
  }

  // 创建存储结果的容器
  Set<E> set = null;
  // 计算新的过期时间
  long newExpirationTime = expirationTime + expirationInterval;
  // 将新的过期时间赋值到变量nextExpirationTime中
  if (nextExpirationTime.compareAndSet(
    expirationTime, newExpirationTime)) {
    // 从expiryMap容器中移除过期时间对应的数据,并将数据保存到结果容器中
    set = expiryMap.remove(expirationTime);
  }
  // 如果结果存储容器为空创建空集合
  if (set == null) {
    return Collections.emptySet();
  }
  return set;
}
在上述代码中核心处理流程如下。
- 获取当前时间。
- 从成员变量nextExpirationTime中获取过期时间。
- 如果当前时间小于过期时间则返回空集合。
- 计算新的过期时间,计算规则:第(2)步结果+过期时间间隔。
- 将新的过期时间赋值到成员变量nextExpirationTime中。如果赋值成功则需要将expiryMap容器中根据第(2)步得到的过期时间移除相关数据,并将这些数据放在结果容器set中。
- 如果结果容器set此时为空则创建空集合返回,反之则将结果容器set返回。
UpgradeableSessionTracker 分析
本节将对UpgradeableSessionTracker类进行分析,该类是LearnerSessionTracker类和LeaderSessionTracker类的父类,在该类中存在两个成员变量详细信息见表。
| 变量名称 | 变量类型 | 变量说明 |
|---|---|---|
| localSessionTracker | LocalSessionTracker | 本地会话跟踪器 |
| localSessionsWithTimeouts | ConcurrentMap<Long, Integer> | 本地session过期映射表,key:session id,value:过期时间。 |
在成员变量中使用到LocalSessionTracker类,LocalSessionTracker类是SessionTrackerImpl的子类,具体实现相对简单,下面将对LocalSessionTracker类进行说明,具体代码如下。
public class LocalSessionTracker extends SessionTrackerImpl {
  public LocalSessionTracker(SessionExpirer expirer,
                             ConcurrentMap<Long, Integer> sessionsWithTimeouts,
                             int tickTime, long id, ZooKeeperServerListener listener) {
    super(expirer, sessionsWithTimeouts, tickTime, id, listener);
  }

  /**
    * 检查session id 是否位于sessionsById容器中
    */
  public boolean isLocalSession(long sessionId) {
    return isTrackingSession(sessionId);
  }

  public boolean isGlobalSession(long sessionId) {
    return false;
  }

  /**
    * 恒定抛出异常
    */
  public boolean addGlobalSession(long sessionId, int sessionTimeout) {
    throw new UnsupportedOperationException();
  }
}
在上述代码中addGlobalSession方法会直接抛出异常,其他方法的处理流程相对简单不做具体说明。了解成员变量相关信息后下面对其中的部分方法进行分析,首先是isTrackingSession方法,具体代码如下。
public boolean isTrackingSession(long sessionId) {
    return isLocalSession(sessionId) || isGlobalSession(sessionId);
}
在这段代码中会通过isLocalSession方法和isGlobalSession方法判断是否跟踪session id对应的session,其中后者方法是一个抽象方法需要子类(LearnerSessionTracker或者LeaderSessionTracker)进行实现,前者方法处理代码如下。
public boolean isLocalSession(long sessionId) {
    return localSessionTracker != null &&
            localSessionTracker.isTrackingSession(sessionId);
}
在上述代码中会回归到LocalSessionTracker类提供的isTrackingSession方法中,具体细节是判断session id是否在SessionTrackerImpl#sessionsById容器中。在UpgradeableSessionTracker类中除了isGlobalSession方法是抽象方法以外,还有checkGlobalSession方法需要子类实现,如果没有实现会默认抛出异常。
最后对UpgradeableSessionTracker类中的upgradeSession方法进行分析,该方法用于升级session,即从本地session升级为全局session,具体处理代码如下。
public int upgradeSession(long sessionId) {
  // 容器localSessionsWithTimeouts为空返回-1
  if (localSessionsWithTimeouts == null) {
    return -1;
  }
  // 从localSessionsWithTimeouts容器中根据session id移除数据,暂存超时时间
  Integer timeout = localSessionsWithTimeouts.remove(sessionId);
  // 超时时间不为空
  if (timeout != null) {
    LOG.info("Upgrading session 0x" + Long.toHexString(sessionId));
    // 将session 放入到全局容器中
    addGlobalSession(sessionId, timeout);
    // 移除本地session
    localSessionTracker.removeSession(sessionId);
    // 返回超时时间
    return timeout;
  }
  return -1;
}
在上述代码中处理流程如下。
- 判断容器localSessionsWithTimeouts是否为空,如果为空则返回-1结束处理。
- 从容器localSessionsWithTimeouts中根据session id移除数据,并暂存超时时间。
- 如果暂存的超时时间不为空则需要将session id添加到公共session中并且移除本地的session,返回暂存超时时间。
- 如果暂存的超时时间为空则返回-1结束处理。
在upgradeSession方法中如果返回值为-1表示参数session id没有对应的session。
LearnerSessionTracker 分析
本节将对UpgradeableSessionTracker类的子类LearnerSessionTracker进行分析,首先需要关注成员变量详细内容见表。
| 变量名称 | 变量类型 | 变量说明 |
|---|---|---|
| expirer | SessionExpirer | session 过期接口 |
| touchTable | AtomicReference<Map<Long, Integer>> | 过期容器,key:session id,value:过期时间。 |
| serverId | long | 服务id |
| nextSessionId | AtomicLong | 下一个session id |
| localSessionsEnabled | boolean | 是否启用本地会话 |
| globalSessionsWithTimeouts | ConcurrentMap<Long, Integer> | 全局session id和过期时间映射,key:session id,value:过期时间。 |
了解成员变量后下面对构造函数进行说明,构造函数代码如下。
public LearnerSessionTracker(SessionExpirer expirer,
                             ConcurrentMap<Long, Integer> sessionsWithTimeouts,
                             int tickTime, long id, boolean localSessionsEnabled,
                             ZooKeeperServerListener listener) {
  this.expirer = expirer;
  this.touchTable.set(new ConcurrentHashMap<Long, Integer>());
  this.globalSessionsWithTimeouts = sessionsWithTimeouts;
  this.serverId = id;
  nextSessionId.set(SessionTrackerImpl.initializeNextSession(serverId));

  this.localSessionsEnabled = localSessionsEnabled;
  if (this.localSessionsEnabled) {
    createLocalSessionTracker(expirer, tickTime, id, listener);
  }
}
在构造函数中大部分数据依靠构造参数传递然后将其赋值到各自的成员变量中,其中成员变量nextSessionId需要通过SessionTrackerImpl.initializeNextSession方法计算,在启用本地会话的情况下需要调用父类的createLocalSessionTracker方法完成父类成员变量localSessionTracker和localSessionsWithTimeouts的创建。
在分析父类时已经了解到方法isGlobalSession需要子类进行实现,下面对该方法进行说明,具体代码如下。
public boolean isGlobalSession(long sessionId) {
    return globalSessionsWithTimeouts.containsKey(sessionId);
}
在上述代码中会返回session id是否在globalSessionsWithTimeouts容器中存在。这是判断是否存在session id的方法与之对应的还需要了解添加到globalSessionsWithTimeouts容器的addGlobalSession方法,具体代码如下。
public boolean addGlobalSession(long sessionId, int sessionTimeout) {
  boolean added =
    globalSessionsWithTimeouts.put(sessionId, sessionTimeout) == null;
  if (localSessionsEnabled && added) {
    LOG.info("Adding global session 0x" + Long.toHexString(sessionId));
  }
  touchTable.get().put(sessionId, sessionTimeout);
  return added;
}
在上述代码中会完成两个容器的数据设置,第一个容器是globalSessionsWithTimeouts,第二个容器是touchTable。在LearnerSessionTracker类中其他关于session跟踪器的方法实现都或多或少基于globalSessionsWithTimeouts容器和touchTable容器进行开发处理逻辑相对简单不做全部分析。
LeaderSessionTracker 分析
本节将对UpgradeableSessionTracker类的子类LeaderSessionTracker进行分析,首先需要关注成员变量详细内容见表。
| 变量名称 | 变量类型 | 变量说明 |
|---|---|---|
| localSessionsEnabled | boolean | 是否启用本地会话 |
| globalSessionTracker | SessionTrackerImpl | 全局session跟踪器 |
了解成员变量后下面对构造函数进行说明,构造函数代码如下。
public LeaderSessionTracker(SessionExpirer expirer,
                            ConcurrentMap<Long, Integer> sessionsWithTimeouts,
                            int tickTime, long id, boolean localSessionsEnabled,
                            ZooKeeperServerListener listener) {

  this.globalSessionTracker = new SessionTrackerImpl(
    expirer, sessionsWithTimeouts, tickTime, id, listener);

  this.localSessionsEnabled = localSessionsEnabled;
  if (this.localSessionsEnabled) {
    createLocalSessionTracker(expirer, tickTime, id, listener);
  }
  serverId = id;
}
在构造函数中大部分数据依靠构造参数传递然后将其赋值到各自的成员变量中,在启用本地会话的情况下需要调用父类的createLocalSessionTracker方法完成父类成员变量localSessionTracker和localSessionsWithTimeouts的创建。
在分析父类时已经了解到方法isGlobalSession需要子类进行实现,下面对该方法进行说明,具体代码如下。
public boolean isGlobalSession(long sessionId) {
  return globalSessionTracker.isTrackingSession(sessionId);
}
在上述代码中会依靠成员变量globalSessionTracker提供的isTrackingSession方法进行判断。这是判断是否存在session id的方法与之对应的还需要了解添加到globalSessionsWithTimeouts容器的addGlobalSession方法,具体代码如下。
public boolean addGlobalSession(long sessionId, int sessionTimeout) {
    boolean added =
            globalSessionTracker.addSession(sessionId, sessionTimeout);
    if (localSessionsEnabled && added) {
        LOG.info("Adding global session 0x" + Long.toHexString(sessionId));
    }
    return added;
}
在上述代码中关于session的添加操作会通过成员变量globalSessionTracker提供的addSession方法进行处理。
在LeaderSessionTracker类中其他关于session跟踪器的方法实现都或多或少基于成员变量globalSessionTracker进行开发处理逻辑相对简单不做全部分析。
总结
本章对Zookeeper项目中的会话管理(会话跟踪)接口SessionTracker进行了相关分析,本章从Zookeeper项目中会话连接建立进行分析,然后引出会话管理接口对该接口的本身以及实现类进行分析。